Making the CNC work can benefit from some optional MPCNC small parts.
Almost all of the plastic parts I have made so far for my Mostly Printed CNC are pretty big, taking 3-5 hours to print each one. Now, while I wait for some hardware and electronics to arrive, I thought I would look at a few optional MPCNC small parts. By comparison, these print in about 7 minutes!
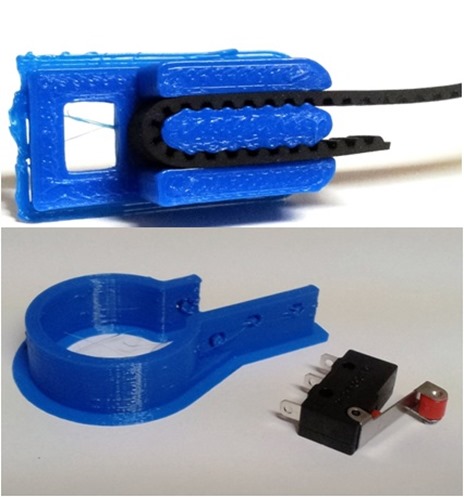
The first option considered was tension clips (see top picture above) for the timing belts used to move the horizontal axes. Yes, these are the same “timing belts” that cost so much to replace in your car’s engine. A timing belt is a non-slipping mechanical drive belt, sometimes called a toothed belt. With the MPCNC, stepper motors control horizontal movement by pulling the gantry back and forth along these belts. These tension clips are available on Thingiverse. They make it easy to increase or decrease the tension in the belts by mating the teeth with the threads in the clip.
The tension clip is the smallest of my MPCNC small parts. Since the belts have a 2 millimeter pitch (distance between teeth) the 3D printer has to be well calibrated. The base of the belt is only 0.63 millimeters thick, or around 1/40 of an inch. As you can see in the top picture, the fit is not perfect, but close enough for good holding performance. I will need four of these clips, one for each end of two timing belts.
MPCNC Small Parts – Mounting End Slots
Slightly larger but still small, the mounting brackets for end stops are the second option – see the lower picture above. An end stop is a device which is triggered when a machine reaches a certain point and you want it to stop automatically. For a CNC machine, end stops are optional but they provide some safety by preventing unwanted motion past the beginning or end of a workspace.
I will use a mechanical switch (shown above, with the red tip) that can be closed when the horizontal axes rollers reach a certain point. They simply press against the switch, which then sends a signal to the controller. I will use five end stop switches, two on each of two horizontal axis, and one at the top of the Z or vertical axis.
The end stop clip will fit in place around the steel conduit rail, with the mechanical switch mounted on the clip. Then the wiring (probably normally open, closing when the switch is touched) runs to the RAMPS 1.4 board and Arduino microcontroller.
By the way, that extra material around the bottom of the two MPCNC small parts shown above is called a “brim”. A brim is extra but removable plastic that helps hold the part to the print bed while it is being printed.
