
Using Meshmixer has a steep learning curve. But it works so well that learning to use it is fun.
Over the past week or so, I have been engaged in trying to make a 3D printed replacement part from scratch. The requires a 3D model for the printer. In previous articles, I have described my struggle with 123D Catch to create a 3D model from a collection of 2D photographs. In this episode, I am using Meshmixer, a companion Autodesk product, to create the final 3D model for printing.
It took me ten tries to create a 3D model using 123D Catch. Each attempt involved taking 30-50 still pictures of my original part from different angles. The keys to success were eventually learned: good focus, good even ambient lighting, and placing small markers on the part to assist with stitching together the pictures into a 3D model.

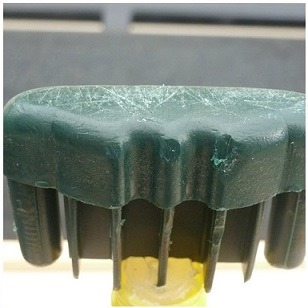
Using Meshmixer involves importing the original model from 123D Catch. As shown in the top left picture, the model was pretty rough compared to the original part, a foot for a patio chair. The part was complex with many facets and angles required to fit into the chair leg. The original part is shown to the right. It is flat on one side and curvy on the other.
The model created by 123D Catch captured the essence of the part but with many imperfections. The main problem was way too much material between the ribs, compared to the original.
Once the raw model is loaded, using Meshmixer allows you to sculpt or remove extra material. It provides virtual tools for removing and adding material. The closest analogies I can think of are an artist removing and adding clay, or a dentist repairing a tooth. You basically choose your tool – shape, size, strength, purpose – and then hold down the mouse button and rub the tool on the surface of the model. This requires a steady hand. And thank goodness for the “undo” feature when things go wrong!
In the top right picture above, you can see that I have removed a lot of extra material between the ribs. I have also cut away material to create a flat solid edge (in green.) In the lower left picture above, you can see that one of the ribs has been repaired. It came out too small in the 123D Catch model. Using Meshmixer, the rib has been extruded to the proper size (in brown).
You can also adjust the dimensions of the model using Meshmixer. I am really just scratching the surface (pun intended) of all the things you can do using Meshmixer. You might want to watch a great demonstration video which was very useful in helping me a short way down the learning curve. This video shows all of the sculpting and repair features described in this article, and a lot more.
Using Meshmixer – Lots of Triangles

The result of all this work is a 3D model ready to print. This is shown in the lower right picture above. The models shown in these pictures are really just a collection of triangles, woven together into a complex three-dimensional mesh.
Here is a close up picture of part of the model, shown to the right. In total, there are more than 250,000 triangles. Using Meshmixer, you can adjust each group of triangles – push or pull, add or remove, dent or pinch, whatever.
In hindsight, this first attempt at creating a 3D model from 2D photographs was almost a “bridge too far”. I should have started with something simpler. Anyway, today I am going to print the part, and will report on that shortly.
If you are interested in playing with the Autodesk 123D Catch and Meshmixer applications, you can down load them here. They are free. 123D Catch is a service, where you send your pictures to Autodesk: their server does the work and sends the results back to you. Typical turnaround time is a half-hour. Meshmixer is a normal Windows application that requires a reasonably strong computer at your end. I would not try to use it on anything less than an i3 CPU.
So far, I have put about 48 hours into this project. Good thing I am retired. Lots of learning, but I still haven’t printed the replacement part. That comes next.